

Find out how to make Farmhouse Signs with Cricut – It’s so easy and is a great beginner Cricut project. You only need a few craft items too!
Make Your Own Farmhouse Sign Using Your Cricut!
Cheree here!
This was the very first Cricut project I had EVER done and I just love the way that it turned out! This Farmhouse Cricut Chalkboard is one of the easiest Cricut projects you’ll ever do.
If you’re new to Cricut, don’t miss our post on easy beginner Cricut projects – as well as how to get the best deal on a bundle and get started with Cricut design space and Cricut access.
It’s a good idea to start with beginner projects (and less than 30 minutes) as you’re getting started. This is a fun project that won’t take a lot of time and is DARLING once it’s finished! I found the SVG file in Cricut Access.
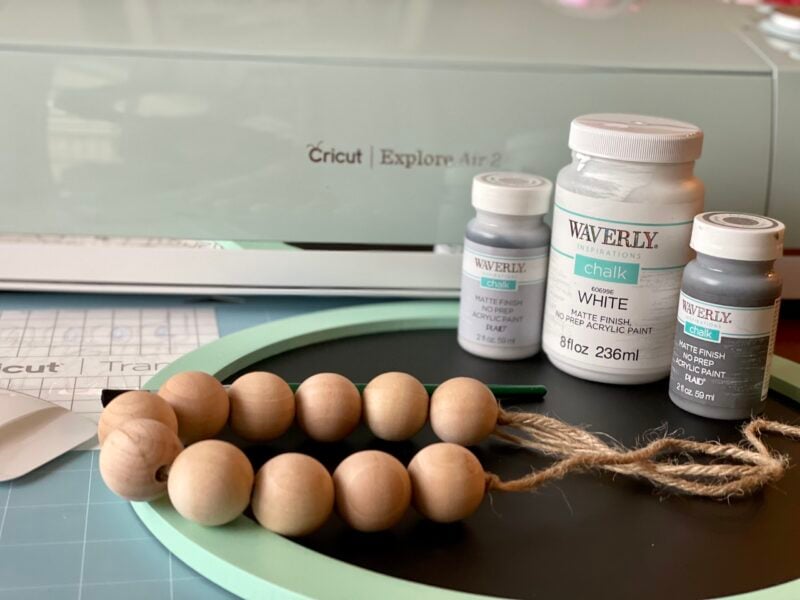
Supplies needed:
- Cricut Machine – we used the Cricut Explore Air 2
- Vinyl, any color
- Chalkboard
- Chalk paint (if needed)
- Wooden Beads
- Jute Twine
- Ribbon (varying widths)
How to make Farmhouse Signs with Cricut Machines:
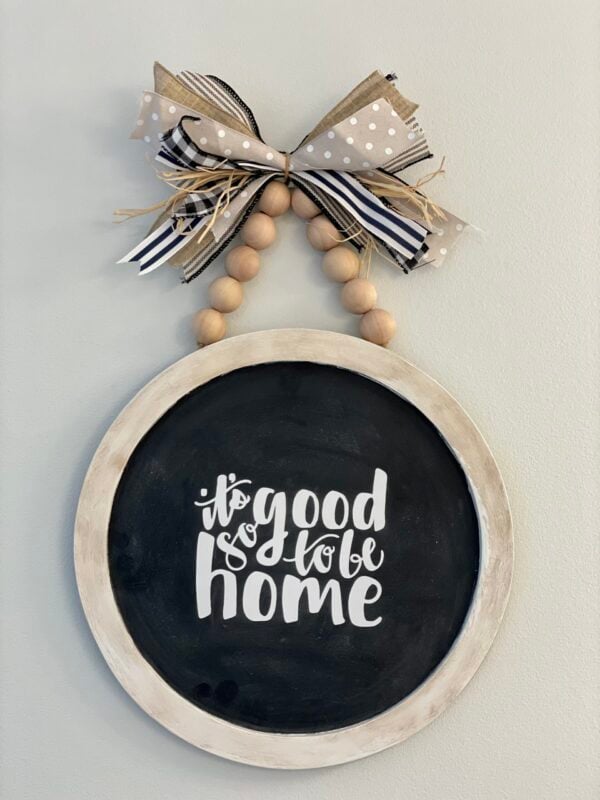
This Farmhouse Cricut Chalkboard came together SO easy. Months ago I purchased this little round chalkboard on clearance at Michael’s. So, it’s been just waiting to get repurposed into a darling piece of DIY wooden farmhouse sign decor.

If you need to paint the edges of your chalkboard, feel free to! The mint green color wasn’t the look I was after so I put on about 3 coats of my favorite white Waverly chalk paint. I then I added just the smallest amount of the Waverly antique wax on top, rubbing off as I went so it didn’t get too dark.
The svg file design I chose just needed 1 color of vinyl so I chose white so it would look like it was written in chalk and have more of a farmhouse decor feel.

Cut out the design on the Cricut machine:
I followed the instructions that were given through Cricut Access once I had picked the design.
- Cut vinyl to about a 6″x6″ square
- Place on grip mat
- Run through the Cricut machine following the directions given
- Weed off the vinyl pieces not needed using the weeding tool
- Apply transfer tape
- Adhere to chalkboard wood sign using the scraper tool


Then I rubbed a piece of chalk all over the design to give this DIY project an authentic chalkboard look and then added a garland.

How to make a Farmhouse Wood Bead Garland:
To take it a step further with the whole Farmhouse vibe I made a little hanger using some jute twine and 1″ wood balls. I just eye-balled it and hot glued that to the back. We have a full tutorial on an easy DIY Wood Bead Garland if you’d like a step by step guide 🙂

It was really cute like that but I thought wouldn’t it just be darling with the addition of a bow. So I made the old faithful Re-Fabbed bow with some ribbon I already had on hand and it was just the perfect finishing touch for this Cricut project.
Now I just need to find a home for this cutie!

If you’re looking for some more Cricut Projects, be sure to check our full post of easy beginner Cricut ideas!


Leave a Reply