

I’m going to keep it short and sweet today, but here’s the most fun little Friday fun I was able to make using just a few Goodwill lamps! I realized after painting them that the lighting in one didn’t work (I think it worked when I first started the project?) but one lamp for under $20 works for me. Here’s what I did . . .

Bought 2 Goodwill lamps, each $4 (if I do this again, I’ll only purchase ones without any decoration on them – the decoration somewhat bled through the paint of the blue lamp.)

Cleaned them really thoroughly with Dawn dish soap.

Used Krylon Looking Glass spray paint to paint them (it did take several coats spraying very carefully so that the paint didn’t run.) I bought the paint using a coupon at JoAnn’s, but this price on Amazon is the lowest it’s been priced at. (One can would have been more than enough to do the lamps, but I didn’t want to run out so I grabbed two.)

Added a $10 shade I’d found at Ballard Designs Outlet (love that store!)

Set it next to my Dollar Tree jelly beans jars. 😉
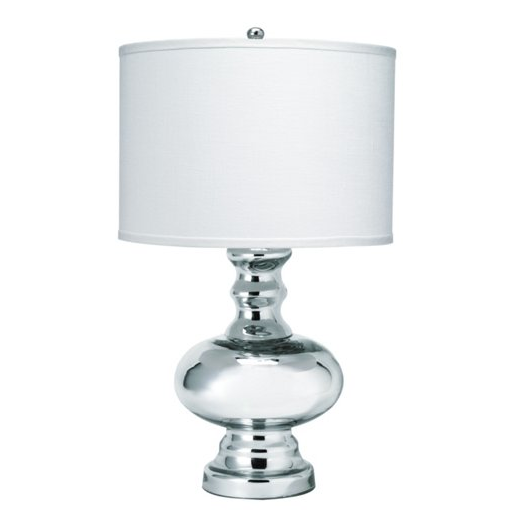
Considering this lamp costs $179 at One King’s Lane (yikes!), I’m pretty pleased with my little Goodwill fun!
These gorgeous lamps ended up in a complete makeover of our guest room – including this homemade sleigh bed! It really came together perfectly.

Looking for more Goodwill ideas? Here are a few of my favorite updates:
I’d love for you to join me over on Pinterest (I love that place!) If you have a blog and have done a little fluffing in your home, I’d love to see it, so leave your link in the comments section. Also, if there’s a craft you’ve seen on a website that you’re hoping to make, feel free to share that link as well (I’m always looking for new ideas!)
See previous Friday Fluff Up projects and ideas . . . and Happy Fluffing!


I wish you were my neighbor! We have several great Goodwills! We’d Goodwill shop together!! I use my finds to make mantle scapes for the different seasons and holidays.
Love!
You don’t even have to buy a whole rewiring kit. I rewired an old table lamp with just a new 3-way socket. Instructions on YouTube were easy to follow.
Spray primer prevents bleed-through. Also learned the hard way. Go with a gray primer for closer match on lighter and darker color coats.
Rewiring a lamp is really not that difficult. You get the complete kit at your hardware store and if you have questions, they can walk you through it. We *always* rewire our thrifted lamps.
1. We like the 3-way bulb sockets(low, med, high, off) for multiuse on our lamps. Old eyes really like upping the lumen output and younger eyes like the extra light every winter in the windowless family room.
2. We have no idea what the lamp went through before we got it; hurricane, tornado, house flood, 40+ years freezing and roasting in an attic, messy fight, ?? For the savings in the finished lamp, it’s not worth the fire risk to NOT rewire.
Our finished thrifted lamps cost 1/4 the price of new ones and seem better made. The most expensive part of the redos is always the lamp shade.
I have been needing lamps for my house forever but I really don’t want to invest in the ones from the store. This is such a great solution!
That’s a great way to get one Stephanie – my Goodwill always has dozens of them so I’m sure you’ll find one that will work for you!
If you’re concerned about the pattern showing use a spray primer first, then the regular spray paint 🙂
Great idea Mendy- thanks for the tip!
Anytime! I too learned about spray primer the hard way 🙂
Cute!!!
Thanks Ladaisha!