
If your kiddos LOVE Legos, here is an awesome way to create a DIY Lego Tray. It’s pretty simple to do and provides a TON of fun too!

DIY Lego Tray – SO Easy to Create and LOADS of Fun!
My friend Jamie is sharing this AMAZING Lego Tray Table idea today, and I’m completely obsessed with it! Such a great idea for traveling and just a fun little project that I love. Thank you so much for sharing Jamie (this one makes me so happy!).
This DIY Lego Tray is STILL probably the “coolest” thing I’ve ever made. When the boys were younger, they VERY rarely got excited when I broke out my hot glue gun (weird?), but when I created this, I definitely heard the words “Whoa!” and “Awesome!” 🙂

SEVERAL years ago, we redid our basement and decided it was time to remove the three (I kid you not – THREE!) bulky Lego tables, in favor of being able to see the floor. This was a problem, because with four Lego-obsessed boys, we had accumulated about 18 million Legos that no longer had a home.
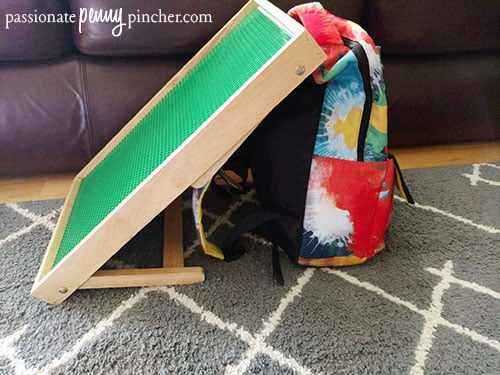
After mulling it over, I figured I could turn an old tray and a few baseplates into a “Mini” building station that could be stashed away or carried from room to room.
This DIY Lego Tray is a PERFECT place to build at home or on the go – and it’s super easy to make!
Here’s how to make this DIY LEGO Tray:
First, you’ll need a tray (with legs) and 3 baseplates. I used this bed tray pictured below, however, there are a LOT of different styles (and some with handles!).

Measure the tray to see how many base plates you need. (You can use real LEGO baseplates OR generic ones will work just as well – it’s what I ended up going with!)
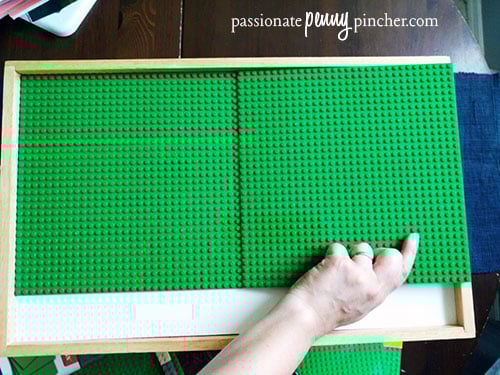
Most baseplates come in 10″x10″ squares. My tray was 19″ x 12″, so I needed 3 – two to fit across the tray and one extra to fill in the gap. I should have known I wouldn’t get lucky and have two cover it perfectly….

Next, use a box cutter to trim the baseplates to fit. I really didn’t think this would actually cut through the plastic – but it did! Once you measure and mark where you need to cut, snap Legos onto the baseplate in a straight line to guide your cutting. This is SO helpful to cut in a straight line.
Press down and guide the box cutter along the line to slice through the plastic. Make the slice over and over and over until it’s ready to bend and snap off. This took me a good five minutes probably.

Check your progress by peeking at the opposite side of the plate once in awhile. When you can see a white line clearly along the entire length of the bottom you know it’s weak enough. Bend it back and forth a few times until it breaks cleanly.
To attach the baseplates to the tray, get a hot glue gun ready. This part is a little bit tricky. The problem is, in the time it takes to cover a baseplate in hot glue, half of it gets hard. Or in my case – I squeezed hot glue into a big square shape on the tray, and then tried to stick the base plate on, but it was mostly hard already. (FYI – you could totally avoid this dilemma by using this glue!)
UGH! Luckily I was able to peel it off and try again. This time I glued each baseplate down in increments.

Stay with me here – because this is extremely scientific. 😉 Starting at one side of the tray, squeeze out several globs of hot glue (Enough to cover about half of a baseplate) and press a baseplate down onto it. Now lift up the edge that doesn’t have any glue under it yet, squirt some more hot glue under there real quick, and stick it back down.
I *wish* I had a picture of this step to show you – but my hands were all tied up trying not to get my skin hot glued off!

Repeat with the other plate and the remaining sections until the tray is covered.
TIP: Click a couple Legos onto the two baseplates to connect them before the glue gets hard. This is just a good way to make sure all the little studs are lined up with each other.
Press around as it dries to make sure everything lays down nice and flat.
If you have a Silhouette or a Cricut, you could make your tray SUPER cute by adding your child’s name. And – oh my gosh – how cute would this be as a gift???

In our family, this little table got used ALL the time (especially with my youngest). I tucked a big comfy reading pillow into a corner of the family room – and it quickly became his happy place. 🙂
Now that I’ve made one for my guys – I’m thinking of making one for my nephew for Christmas. If you get a chance to try this DIY Lego Tray – I’d love to hear how it turned out! Especially if you have any tips or tricks that you did to personalize your tray – or anything that made it easier along the way!


This is beautiful and I plan to make ! How do you store your Lego ? I’m in dire need of ideas !!!
Team member, Laura, just grabbed this for his kid’s toys. They are a really good deal right now! https://passionatepennypincher.com/toy-organizer-lowest-price-ever/
Do the generic base plates work with legos brand?
Yes, they do – my son used these when he was younger. Hope that helps! 🙂
Where do you find the trays with the legs like that I could really use them for legos ?
Here’s the link Jean! 🙂 –> https://www.amazon.com/dp/B001U88698//?tag=publix-20
I’ve made 2 Lego tables now, one I built the frame for to fit over my son’s existing activity table and be removable, and this version for my niece! I used spray adhesive both times to attach the lego mats. It has worked well, and my son’s table has held up to the beating a boy gives his toys! I LOVE your tip of lining lego bricks up to make a straight cut! I unfortunately didn’t think of this and eyeballed as straight a cut as possible using scissors!
Love that you’ve made 2 Stephanie – that’s amazing, and the spray adhesive idea is genius!
Dollar Tree sells base plates, blocks, figures etc